 Pin this
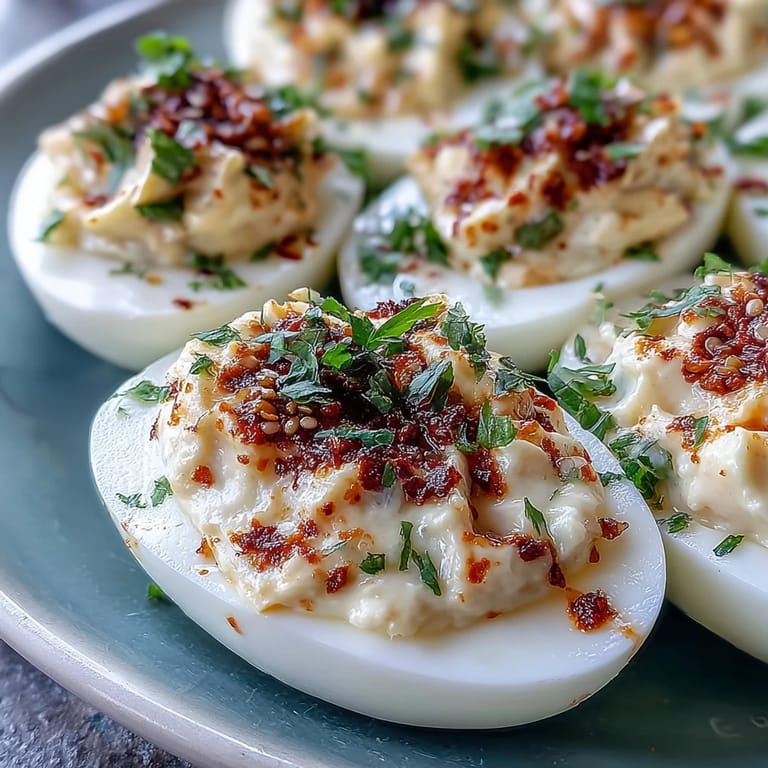
 The first time I brought these to a potluck, my friend Sarah literally hovered over the plating board. She kept sneaking halves when she thought no one was watching, and by the time I turned around, only three eggs remained. That vibrant red oil glistening against the creamy yellow filling makes them impossible to resist, and the way the crunch hits first followed by that gradual heat build-up is completely addictive.
Last summer, I made these for a rooftop gathering and ended up fielding requests for the recipe through three different group chats. There is something almost magical about how a familiar comfort food suddenly feels exciting and new. My brother, who normally claims to despise deviled eggs of any kind, ate four and asked if I could teach him the technique.
Ingredients
- 6 large eggs: Room temperature eggs peel more cleanly, plus they cook more evenly
- 2 tablespoons mayonnaise: Japanese Kewpie mayo will make these taste restaurant-quality
- 1 teaspoon Dijon mustard: Adds that essential sharp tang that cuts through the richness
- Salt and black pepper: Freshly cracked pepper makes a huge difference here
- 1/2 teaspoon sriracha: Optional but builds a nice background heat
- 1/4 teaspoon rice vinegar: A tiny splash brightens everything beautifully
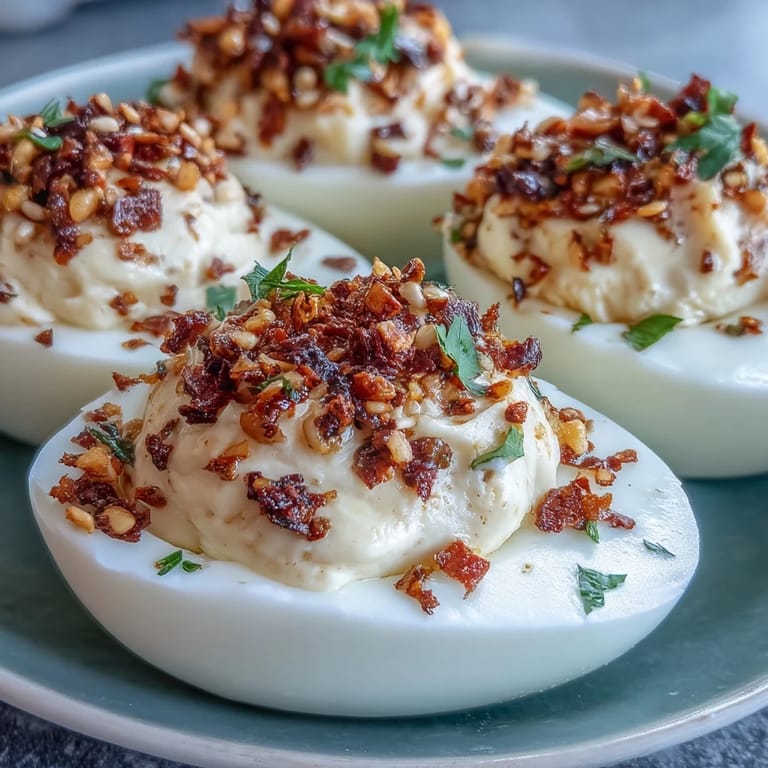
- 2 tablespoons chili crisp: This is the real star, get the good stuff with lots of crunchy bits
- 1 teaspoon toasted sesame seeds: Adds nuttiness and extra crunch
- 1/2 teaspoon soy sauce: Use tamari if you need this gluten-free
- Fresh cilantro or scallions: That pop of green makes these look stunning
Tired of Takeout? 🥡
Get 10 meals you can make faster than delivery arrives. Seriously.
One email. No spam. Unsubscribe anytime.
Instructions
- Perfect those eggs:
- Place your eggs in cold water, bring to a boil, then kill the heat and cover for 12 minutes exactly
- The ice bath trick:
- Shock those peeled eggs in ice water for 5 full minutes so the yolks stay bright yellow
- Prep your canvas:
- Slice eggs in half lengthwise and gently scoop those yolks into your mixing bowl
- Create the filling:
- Mash everything until completely smooth, no lumps allowed in this silky mixture
- Fill them up:
- Pipe or spoon generously, do not be shy with that filling
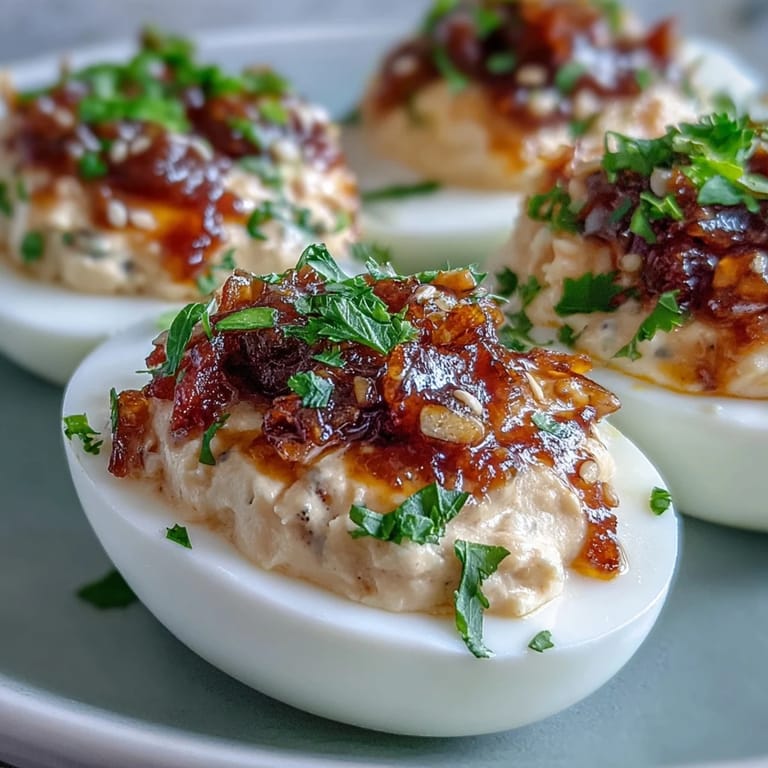
- The grand finale:
- Stir together your chili oil topping and drizzle it generously over each egg half
- Garnish and serve:
- Scatter fresh herbs right before serving so they stay vibrant and pretty
 Pin this
 These have become my go-to contribution whenever someone says just bring something small. The way guests light up when they see them, then do that double-take at the first spicy crunch bite. I started making extra because people always ask for seconds, and now it is just part of my routine.
Make-Ahead Magic
You can absolutely prep the filling and boil the eggs up to 24 hours in advance. Just store the egg white halves and filling separately in airtight containers. That way, the whites stay fresh and the filling maintains its perfect texture. Wait to assemble until right before serving.
Spice Level Control
Not everyone handles heat the same way, and that is completely fine. I usually set aside a portion of the plain filling before mixing in sriracha. Then I can make mild, medium, and spicy batches without any extra work. Your guests will appreciate having options.
Serving Suggestions
These pair beautifully with ice-cold lagers or a crisp white wine that can stand up to the heat. I have also learned to serve them with small cocktail napkins because that chili oil can get a little messy. Consider a platter with plain cucumber slices for guests who need to cool down between bites.
- Use a small piping bag for the neatest presentation
- Toast your sesame seeds right before using for maximum flavor
- Keep the chili crisp at room temperature for easier drizzling
 Pin this
 These little bites have started so many conversations at my gatherings. Watch them disappear and get ready to share that recipe link.
Frequently Asked Recipe Questions
- → How far ahead can I make these?
Prepare the filling and whites separately up to 24 hours in advance. Store in airtight containers in the refrigerator. Assemble and add the spicy topping just before serving to maintain the crispy texture.
- → What's chili crisp and where can I find it?
Chili crisp is an Asian condiment featuring oil-infused dried chilies, garlic, and sometimes crispy onions or soybeans. Look for brands like Lao Gan Ma in Asian grocery stores or the international aisle of well-stocked supermarkets.
- → Can I adjust the heat level?
Absolutely. Start with less chili garlic oil and add gradually to taste. For milder versions, use a touch less chili crisp and reduce the red pepper flakes. For extra heat, increase sriracha in the filling and add more red pepper flakes to the topping.
- → How do I get perfectly smooth filling?
Press the yolks through a fine-mesh sieve before mixing with other ingredients. This ensures no lumps remain. Using room-temperature ingredients also helps achieve a silky, lump-free consistency.
- → What can I use instead of chili crisp?
Combine crushed red pepper flakes, minced garlic, and a neutral oil that's been heated and slightly cooled. Alternatively, use sriracha mixed with a bit of crushed fried onions for similar crunch and heat.